How to Stain and Seal a Fence: Complete Step-by-Step Guide for Wood Protection and Maintenance
Staining and sealing a wood fence is essential for maintaining its beauty and extending its lifespan. This comprehensive guide will walk you through the necessary steps, tools, and techniques to effectively stain and seal your fence, ensuring it remains protected against the elements. Many homeowners struggle with the upkeep of their wooden fences, leading to deterioration and costly repairs. By following this guide, you will learn how to properly prepare your fence, choose the right products, and apply them effectively for long-lasting results. We will cover everything from the tools needed to the best types of stains and sealers, as well as maintenance tips to keep your fence looking great for years to come.
What Tools and Materials Are Needed to Stain and Seal a Wood Fence?
To successfully stain and seal a wood fence, you will need a variety of tools and materials. Having the right equipment ensures a smooth application process and optimal results. Here’s a list of essential tools and materials you should gather before starting your project:
- Stain and Sealer: Choose a high-quality wood stain and sealer suitable for outdoor use.
- Brushes and Rollers: Use brushes for detailed areas and rollers for larger surfaces to ensure even coverage.
- Sprayer: A paint sprayer can speed up the application process for larger fences.
- Drop Cloths: Protect the ground and surrounding areas from drips and spills.
- Sandpaper: Use sandpaper to smooth the surface of the wood before application.
- Cleaning Supplies: A pressure washer or scrub brush, along with a wood cleaner, will help prepare the fence.
- Protective Gear: Gloves, goggles, and a mask are essential for safety during the staining process.
Gathering these tools and materials will set you up for success as you begin the staining and sealing process.
Which Fence Staining Tools Ensure Effective Application?
Using the right tools is crucial for achieving a professional finish when staining your fence. Here are some tools that enhance the effectiveness of your application:
- Quality Brushes: A high-quality brush allows for better control and precision, especially in corners and detailed areas.
- Rollers: Rollers can cover large areas quickly and evenly, making them ideal for flat surfaces.
- Paint Sprayers: For those with larger fences, a paint sprayer can provide a smooth, even coat and save time.
- Extension Poles: These can be attached to brushes or rollers to reach higher areas without the need for a ladder.
- Drop Cloths: Essential for protecting your landscaping and surfaces from overspray and drips.
Investing in these tools will help ensure that your staining project is efficient and yields a beautiful finish.
What Types of Stains and Sealers Are Best for Outdoor Wood Protection?
Choosing the right stain and sealer is vital for protecting your wood fence from the elements. Here are some types to consider:
- Transparent Stains: These provide a natural look while allowing the wood grain to show through. They offer minimal protection and are best for new wood.
- Semi-Transparent Stains: These offer a balance between color and wood visibility, providing better protection against UV rays and moisture.
- Solid Stains: These provide the most coverage and protection, hiding the wood grain while offering excellent durability against weathering.
- Sealants: A good sealant will protect against moisture and extend the life of the stain. Look for products that are UV-resistant and waterproof.
Selecting the appropriate stain and sealer will enhance the longevity and appearance of your fence.
How Do You Properly Prepare a Fence Before Staining and Sealing?
Preparation is key to a successful staining project. Properly preparing your fence ensures that the stain adheres well and provides long-lasting protection. Here are the steps to follow:
- Inspect the Fence: Check for any damage, such as rot or loose boards, and make necessary repairs.
- Clean the Surface: Use a pressure washer or wood cleaner to remove dirt, mildew, and old stain. Allow the fence to dry completely.
- Sand the Wood: Lightly sand the surface to create a smooth texture for better stain absorption. Focus on rough spots and areas with old stain.
- Mask Off Areas: Use painter’s tape to protect adjacent surfaces and plants from overspray.
By following these preparation steps, you will create an ideal surface for staining and sealing.
Beyond cleaning and sanding, historical advice underscores the importance of allowing any applied wood preservatives to thoroughly dry before proceeding with staining or painting.
Wood Fence Protection: Preservative & Staining Prep
wood pieces and joints in the fence with a water-repellent preservative. Let treated wood dry for several days before painting or staining.
Protecting wood fences for yard and garden, 1979
What Are the Steps to Clean and Sand a Wood Fence for Optimal Stain Absorption?
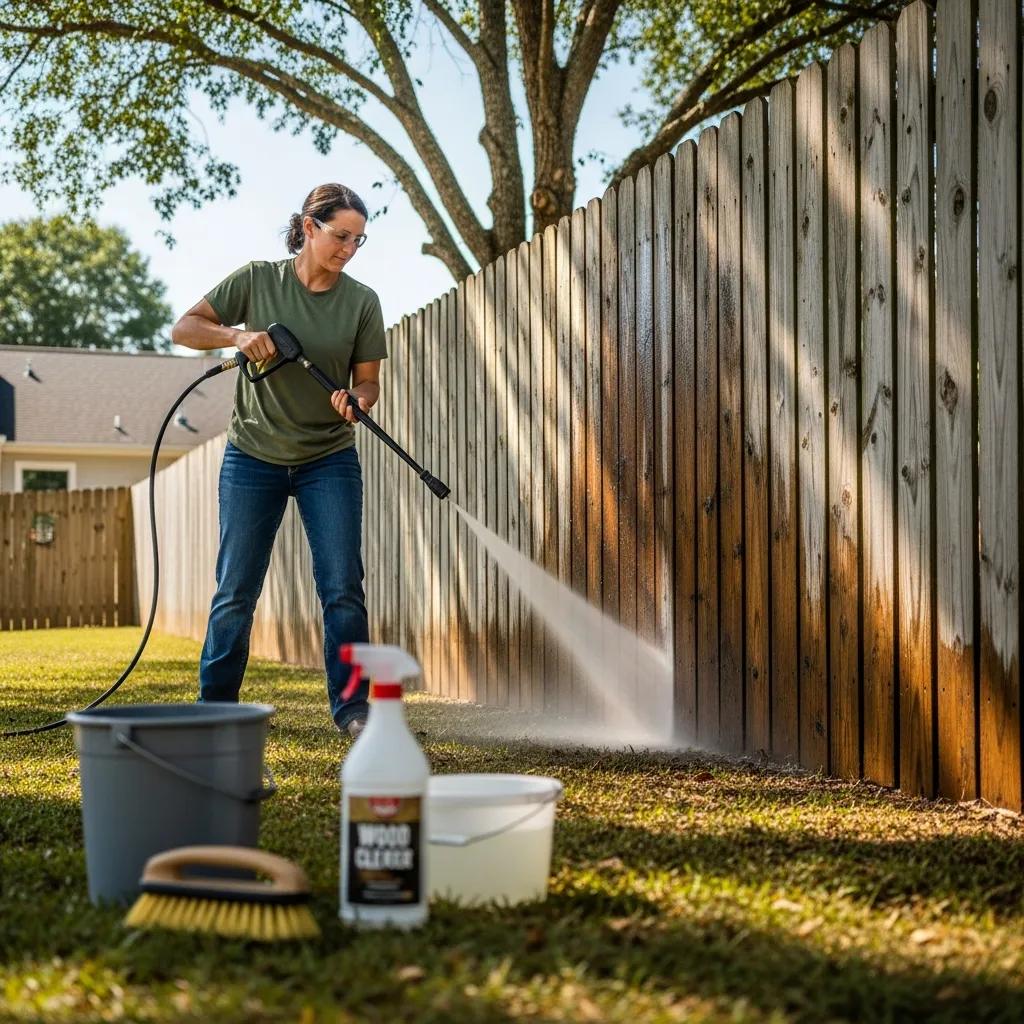
Cleaning and sanding your wood fence is crucial for optimal stain absorption. Here’s how to do it effectively:
- Remove Debris: Clear any leaves, dirt, or debris from the fence area.
- Pressure Wash: Use a pressure washer to clean the fence thoroughly. This removes dirt and old finishes that can hinder stain adhesion.
- Apply Wood Cleaner: If necessary, apply a wood cleaner to eliminate mildew and stains. Rinse thoroughly and allow the fence to dry.
- Sand the Surface: Use medium-grit sandpaper to sand the entire surface. This helps open the wood pores for better stain penetration.
- Dust Off: After sanding, wipe down the fence with a damp cloth to remove dust and debris.
These steps will ensure that your fence is clean and ready for staining.
How Does Weather and Fence Type Affect Preparation Methods?
Weather conditions and the type of wood used for your fence can significantly impact the preparation process. Here’s how:
- Weather Conditions: Ideal temperatures for staining are between 50°F and 90°F. Avoid staining in direct sunlight or during rain, as this can affect drying times and adhesion.
- Wood Type: Different woods absorb stains differently. Softwoods like pine may require more preparation than hardwoods like cedar. Always test a small area first to see how the wood reacts.
- Moisture Levels: Ensure the wood is dry before applying stain. High humidity can prevent proper drying and lead to issues like peeling.
Understanding these factors will help you choose the best time and method for preparing your fence.
How to Choose the Best Fence Stain Types for Long-Lasting Wood Protection?
Selecting the right stain type is essential for long-lasting protection. Here are some factors to consider:
- Wood Type: Different woods have varying porosities. Choose a stain that complements the wood species of your fence.
- Desired Appearance: Consider whether you want a natural look or a more opaque finish. Transparent stains show the wood grain, while solid stains provide more color.
- Durability Needs: If your fence is exposed to harsh weather, opt for a stain with UV protection and water resistance.
- Maintenance Requirements: Some stains require more frequent reapplication than others. Choose a product that fits your maintenance schedule.
By considering these factors, you can select a stain that will provide the best protection for your fence.
What Are the Differences Between Transparent, Semi-Transparent, and Solid Stains?
Understanding the differences between stain types can help you make an informed choice. Here’s a breakdown:
Transparent stains allow the wood grain to show through, while solid stains provide maximum coverage and protection. Semi-transparent stains offer a balance between the two.
How Do Eco-Friendly and UV-Resistant Stains Compare?
When choosing a stain, consider eco-friendly and UV-resistant options. Here’s how they compare:
- Eco-Friendly Stains: These are made from natural ingredients and are less harmful to the environment. They often have lower VOC levels, making them safer for indoor use.
- UV-Resistant Stains: These stains contain additives that protect the wood from sun damage, preventing fading and degradation over time.
- Performance: While eco-friendly stains may require more frequent reapplication, UV-resistant stains provide longer-lasting protection against the elements.
Choosing a stain that meets both environmental and performance standards will benefit your fence and the planet.
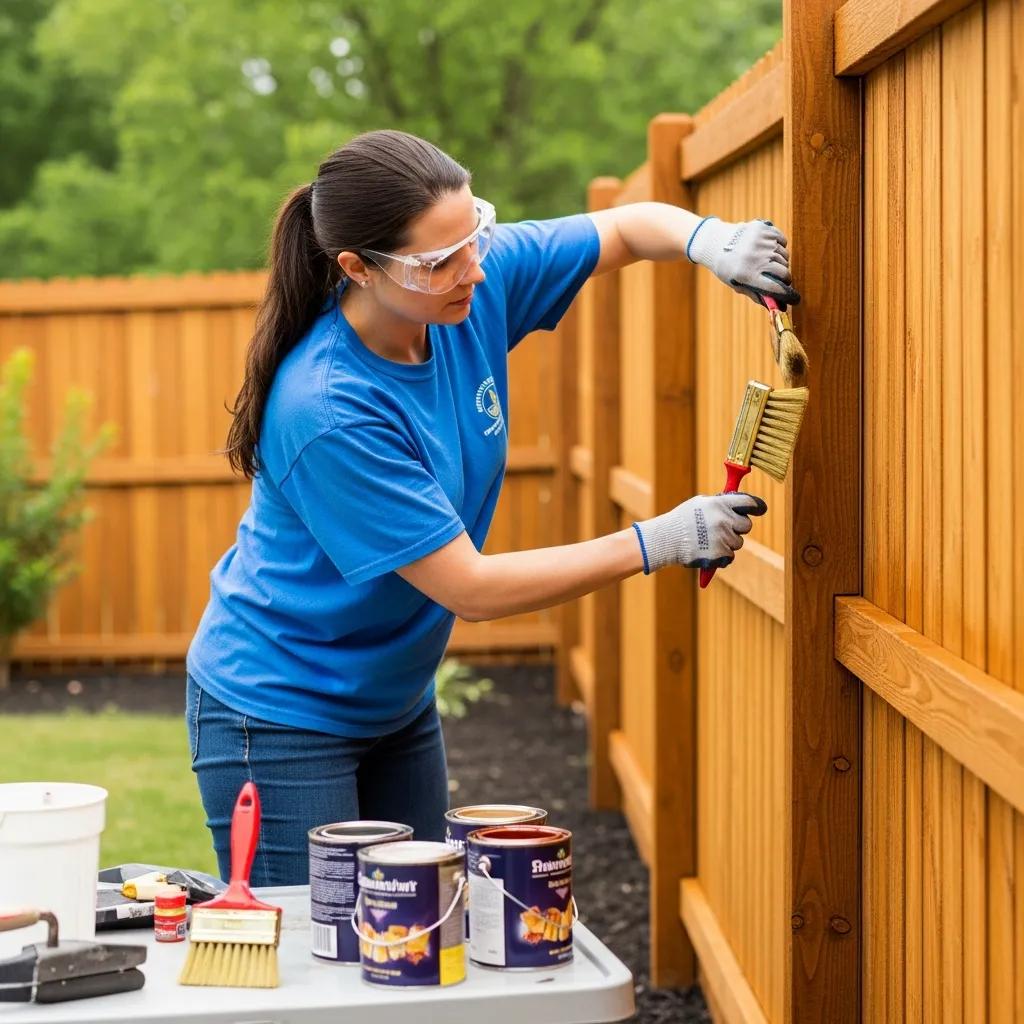
What Are the Step-by-Step Techniques to Apply Stain and Seal a Fence?
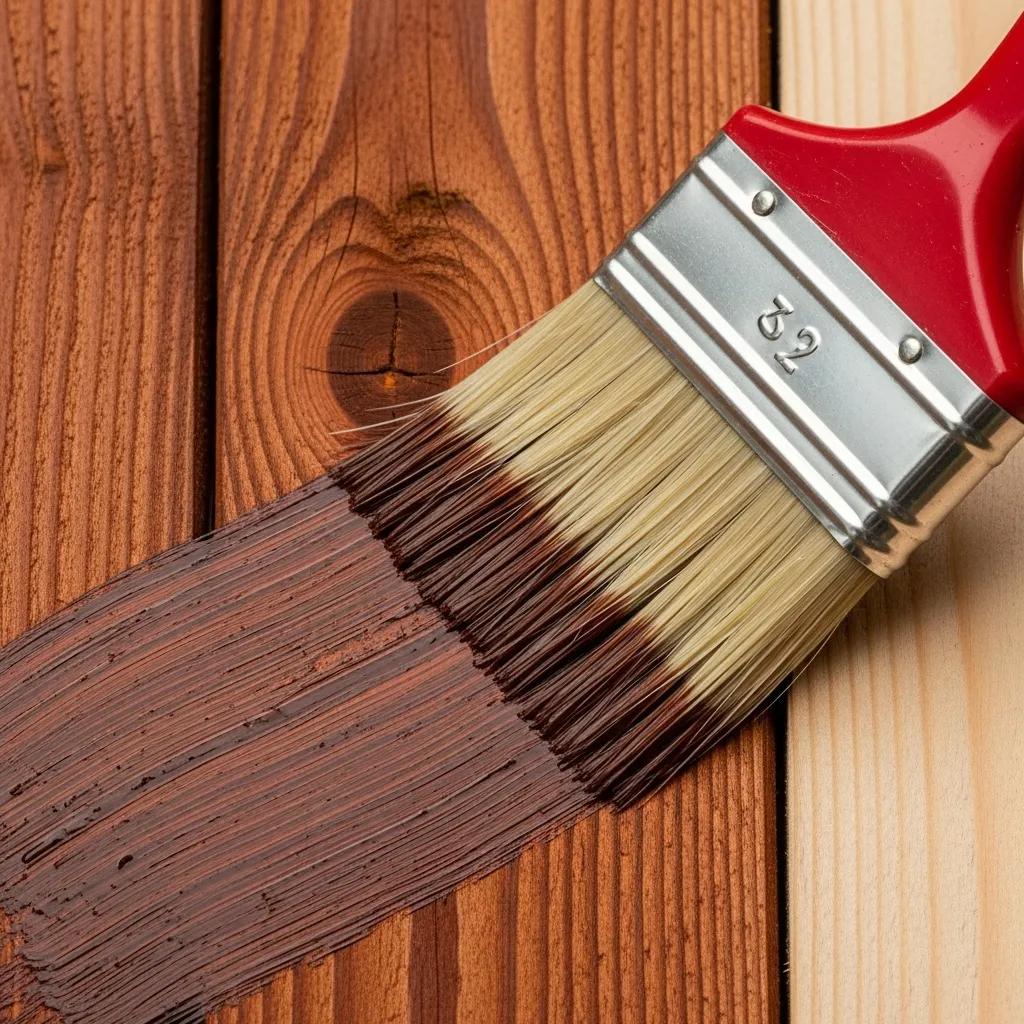
Applying stain and sealant requires careful technique to ensure even coverage. Follow these steps for the best results:
- Start at the Top: Begin staining at the top of the fence and work your way down to prevent drips.
- Use Long Strokes: Apply the stain using long, even strokes to avoid streaks and ensure even coverage.
- Work in Sections: Divide the fence into manageable sections, allowing each section to dry before moving on.
- Check for Evenness: After applying, check for any missed spots or uneven areas and touch them up as needed.
- Apply Sealant: Once the stain is dry, apply a sealant following the same techniques to protect the wood.
These techniques will help you achieve a professional-looking finish on your fence.
How Should You Apply Stain for Even Coverage and Proper Drying?
To ensure even coverage and proper drying, consider the following tips:
- Temperature and Humidity: Stain in moderate temperatures and low humidity for optimal drying conditions.
- Test Application: Always test a small area first to see how the wood absorbs the stain.
- Avoid Overlapping: When applying stain, avoid overlapping strokes to prevent dark patches.
- Allow Adequate Drying Time: Follow the manufacturer’s instructions for drying times between coats.
By following these guidelines, you can achieve a uniform finish that enhances the beauty of your fence.
When and How Do You Apply Sealers to Extend Fence Lifespan?
Applying sealers is crucial for extending the lifespan of your fence. Here’s when and how to do it:
- Timing: Apply sealers after the stain has fully dried, typically 24-48 hours after staining.
- Application Method: Use a brush or sprayer to apply the sealer evenly across the surface.
- Follow Instructions: Always adhere to the manufacturer’s guidelines for application and drying times.
- Reapplication: Plan to reapply sealers every 1-3 years, depending on weather exposure and wear.
Proper sealing will protect your fence from moisture and UV damage, ensuring it lasts for years.
What Are Essential Fence Maintenance Tips After Staining and Sealing?
After staining and sealing your fence, regular maintenance is key to its longevity. Here are some essential tips:
- Regular Inspections: Check for signs of wear, damage, or mold regularly.
- Cleaning: Clean the fence annually to remove dirt and debris that can cause deterioration.
- Reapplication: Plan to restain and reseal every 1-3 years, depending on the product used and environmental conditions.
- Repair Damage Promptly: Address any damage or wear immediately to prevent further issues.
These maintenance tips will help keep your fence in excellent condition.
How Often Should You Reseal or Restain a Wood Fence?
The frequency of resealing or restaining your wood fence depends on several factors:
- Environmental Exposure: Fences exposed to harsh weather conditions may require more frequent maintenance.
- Type of Stain Used: Some stains last longer than others; check the manufacturer’s recommendations.
- Signs of Wear: If the color fades or the wood appears dry, it’s time to reapply.
As a general guideline, plan to reseal or restain every 1-3 years to maintain protection and appearance.
What Troubleshooting Steps Address Common Fence Staining Issues?
If you encounter issues during the staining process, here are some troubleshooting steps:
- Streaking: If streaks appear, ensure you are applying the stain evenly and not over-applying in certain areas.
- Peeling: If the stain peels, it may be due to moisture trapped under the stain. Ensure the wood is completely dry before application.
- Fading: If the stain fades quickly, consider using a UV-resistant product for better protection.
By addressing these common issues, you can achieve a beautiful and durable finish on your fence.
To ensure your fence remains in top condition, consider professional fence installation and repair services.
Maintaining your fence can be a daunting task. If you’re in need of assistance, get a free quote from local professionals to ensure the job is done right.
For those looking to enhance their outdoor space further, consider exploring options for deck builders to create a cohesive and beautiful backyard.